DOM元素导出图片与PDF:多种方案对比与实现
/ 14 分钟阅读 /
目录 Table of Contents
文章详细介绍了将 HTML DOM 元素转换为图片或 PDF 的多种方法,包括使用 html2canvas、dom-to-image、Puppeteer 和 canvas原生绘制等技术。文章分析了每种方法的实现过程、使用场景、优缺点,并提供了代码示例,帮助开发者根据具体需求选择合适的解决方案。
背景
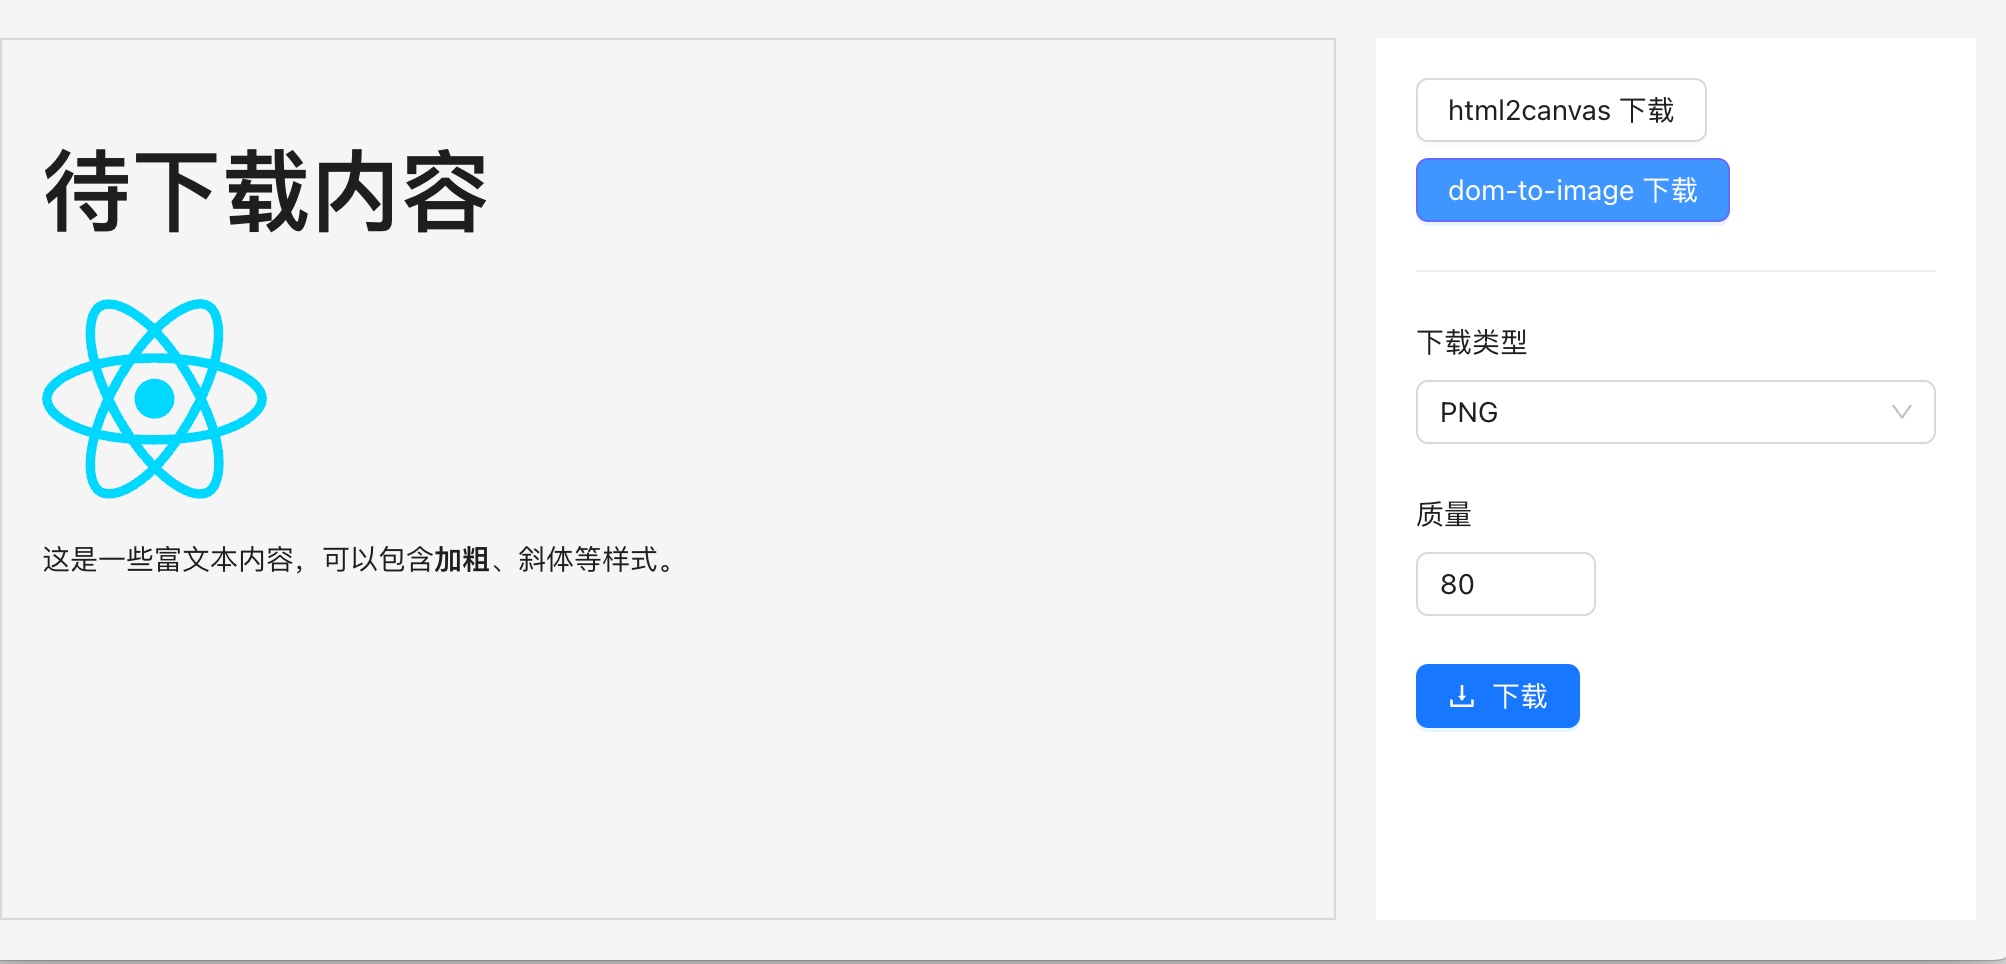
在日常前端开发中,经常会有把页面的 DOM 元素作为 PNG 或者 PDF 下载到本地的需求。例如海报功能,简历导出功能等等。在我们自家的产品「代码小抄」中,就使用了 html2canvas 来实现代码片段导出为图片:
是不是还行,大家如果想要分享代码片段,可以试试,非常好用。那有哪些方法可以实现下载 DOM 元素到本地呢?目前收集到的有:
- 通过 html2canvas 、dom-to-image 等第三方库实现
- 通过 Puppeteer 启动一个 node 服务实现
- canvas 原生绘制
这些方式是真实项目会使用的方式,针对不同场景可以使用不同的方法,下面看一下每种方法如何实现、使用场景和优缺点,
方案 1 - html2canvas
html2canvas 专门用于解析 DOM 结构及其关联的 CSS 样式,进而将网页内容渲染为 Canvas 元素的 JavaScript 库,下面是下载元素为 PNG 的示例代码:
/** * 下载 dom 元素为图片 * @param elementId DOM 元素id * @param fileName 下载图片的文件名 * @returns */export const downloadDOMElementAsImage = async (elementId: string, fileName: string) => {  const element = document.getElementById(elementId) as HTMLElement;  if (!element) return message.warn('无法找到 DOM 元素');  try {    // 将 DOM 元素转换为 canvas    const canvas = await html2canvas(element, {      useCORS: true,      allowTaint: true,      // 提高清晰度      scale: 2,      backgroundColor: 'transparent',    });    // 将 canvas 转换为数据 URL    const dataUrl = canvas.toDataURL('image/png');    // 创建一个临时的 <a> 元素,设置其 href 为数据 URL 并设置 download 属性    const link = document.createElement('a');    link.style.visibility = 'hidden';    link.href = dataUrl;    link.download = fileName;
    // 将 <a> 元素添加到 DOM,触发点击事件,然后从 DOM 中移除    document.body.appendChild(link);    link.click();    document.body.removeChild(link);  } catch (error: any) {    message.error('无法将 DOM 元素转换为图片并下载', error);  }  element.style.transform = 'scale(1)';};
通过 html2canvas ,我们封装了一个下载页面 DOM 为图片的方法,然后就可以很方便的调用方法进行页面元素的下载
使用场景
适用于需要将复杂的 DOM 结构(包括样式、背景图像、字体等)渲染为图片的场景。它可以捕获大部分 CSS 样式和 HTML 内容
优缺点
优点:
- 使用非常简单,支持大多数 css
- 内置跨域解决方案
- 可以通过 ignoreElements 过滤指定 DOM,这在处理复杂 DOM 结构的时候非常有用
缺点:
- 下载的图可能不清晰
- 库比较大
- 计算耗时,性能不好
- 部分特殊的样式可能不支持,存在兼容性问题
方案 2 - dom-to-image
dom-to-image 是一个用 JavaScript 编写的库,可以将任意 DOM 节点转换为矢量(SVG)或光栅(PNG 或 JPEG)图像。它和 html2canvas 一样也是基于 canvas 封装的库。看一下生成 PNG 的示例代码:
/** * 下载 DOM 元素为高质量图片 * @param elementId DOM 元素id * @param fileName 下载图片的文件名 * @param sc 缩放比 * @returns */export const downloadDOMElementAsImage = async (elementId: string, fileName: string, sc = 3) => {  const element = document.getElementById(elementId) as HTMLElement;  if (!element || !window || !document) return message.warning("无法找到 DOM 元素");  const messageKey = "loading";  message.loading({    content: "正在下载...",    duration: 0,    key: messageKey,  });  try {    const clone = element.cloneNode(true) as HTMLElement;    document.body.appendChild(clone);    // 临时增加元素尺寸以提高分辨率    const originalWidth = element.offsetWidth;    const originalHeight = element.offsetHeight;    const scale = sc; // 增加缩放因子以提高分辨率
    // 设置相对定位,zIndex 为 -1    clone.style.position = "relative";    // clone.style.zIndex = "-1";    clone.style.transform = `scale(${scale})`;    clone.style.transformOrigin = "top left";
    const dataUrl = await domtoimage.toPng(clone, {      width: originalWidth * scale,      height: originalHeight * scale,      style: {        transform: `scale(${scale})`,        transformOrigin: "top left",        width: `${originalWidth}px`,        height: `${originalHeight}px`,      },      cacheBust: true,      quality: 1,      bgcolor: "transparent",    });
    // 创建下载链接    const link = document.createElement("a");    link.href = dataUrl;    link.download = fileName;    document.body.appendChild(link);    link.click();    document.body.removeChild(link);    message.destroy(messageKey);    setTimeout(() => {      document.body.removeChild(clone);    }, 500);  } catch (e: any) {    message.destroy(messageKey);    console.error("下载失败", e.message);    message.error("下载失败: " + e.message);  }};
可以看到使用也非常简单,我们可以通过 sc 参数来控制下载图片的清晰度和大小。
使用场景
如果对项目大小有要求,希望文本排版支持度高,需要稳定的文字、图片渲染能力或者处理结构化数据的能力,可以使用 dom-to-image
优缺点
优点:
- 库比较轻量
- 适用于需要多格式导出的场景
缺点:
- 需要手动处理跨域
方案 3.1 - Puppeteer
上面两种方法虽然可以在 web 端生成图片,但是如果需要:
- 兼容多端,
- 同时支持生成 PNG 和 PDF,并且要求非常清晰,
- 兼容图片跨域
- 兼容所有 css
- 对项目体积有要求
那我们就可以使用 Puppeteer 来实现,它可以解决上面所有的问题。Puppeteer 是一个强大的 Node.js 库,用于控制 Chrome 或 Chromium 浏览器来帮我们生成想要的 PNG 或者 PDF,下面我们就使用 express + Puppeteer 来快速实现一个图片下载服务:
// node 服务 app.js 示例代码import cors from "cors";import express from "express";import puppeteer from "puppeteer";
const app = express();app.use(cors());
app.use(express.json());
app.get("/", (req, res) => {  res.send("面试刷题,我只用面试鸭~");});
app.post("/download", async (req, res) => {  const { url, quality, format, filename, domId, type } = req.body;
  if (!url || !filename || !domId || !type) {    return res.status(400).send("Missing required parameters");  }
  try {    // 启动浏览器    const browser = await puppeteer.launch();    // 新建一个页面    const page = await browser.newPage();    // 设置默认一分钟超时    await page.setDefaultNavigationTimeout(60000);    // 打开页面    await page.goto(url, { waitUntil: "networkidle0" });
    if (type === "png") {      // 等待元素加载      await page.waitForSelector(`#${domId}`);
      // 等待元素加载      await page.waitForSelector(`#${domId}`);
      // 截取指定元素的截图      const element = await page.$(`#${domId}`);      console.log(element, "element");
      const imageBuffer = await element.screenshot({        type: "jpeg",        quality: parseInt(quality), // 仅适用于 jpeg        // omitBackground: true,      });      await browser.close();      res.contentType("image/jpeg");      res.attachment(filename + ".jpeg");      // 返回二进制数据给前端      res.send(Buffer.from(imageBuffer, "binary"));    } else if (type === "pdf") {      const pdf = await page.pdf({        format: format || "A4",        printBackground: true,        pageRanges: "1-" + (req.body.pages || "1"),      });      res.contentType("application/pdf");      res.attachment("resume.pdf");      // 返回二进制数据给前端      res.send(Buffer.from(pdf));    } else {      res.status(400).send("Invalid type");    }
    await browser.close();  } catch (error) {    console.error(error);    res.status(500).send("Internal Server Error");  }});
const PORT = 3001;app.listen(PORT, () => {  console.log(`Server is running on http://localhost:${PORT}`);});
通过 Puppeteer 我们可以很方便的进行屏幕截取,因为它就是通过游览器内核来实现,所以它能完全还原展示效果
使用场景
如果需要下载图片和 PDF,对图片清晰度还有要求,页面元素还比较复杂,生成图片和 PDF 需要多端支持等等,可以使用 Puppeteer 来实现
优缺点
优点:
- 高度还原视图:Puppeteer 使用的是无头 Chrome 浏览器,所以它生成的 PDF 和截图与用户在浏览器中看到的内容几乎完全一致
- 丰富的 API: Puppeteer 提供了超多 API,基本可以解决所有遇到的问题,相关文档地址:https://github.com/puppeteer/puppeteer/blob/v1.5.0/docs/api.md,非常多的 API
- 支持最新的 css:由于 Puppeteer 使用的是 Chrome 浏览器,它支持所有现代 Web 特性,因此它在处理复杂网页时非常有优势
- 跨域资源支持: Puppeteer 通常以无头模式运行,这种模式下浏览器跨域访问的限制会放宽
缺点:
- 需要部署服务:Puppeteer 需要在服务器端运行,需要一个后端环境来支持它。
- 资源消耗大: 由于 Puppeteer 启动的是一个完整的 Chrome 浏览器实例,因此它的资源消耗相对较大,可能会影响服务器的性能
- 额外的学习成本:如果团队都对 Puppeteer 不了解,可能需要额外的学习和维护成本
但是如果使用 Puppeteer 去生产环境使用,可能还会有同时处理大量请求导致服务资源被消耗光,甚至导致下载服务奔溃的情况,这时候我们就可以使用 puppeteer-cluster 来实现请求队列, 使用队列系统来管理请求,确保同时只处理一定数量的请求,其他请求则排队等待
方案 3.2 - puppeteer-cluster
代码示例:
// 源码:https://github.com/chaseFunny/pdf-png-downloaderimport cors from "cors";import express from "express";import { Cluster } from "puppeteer-cluster";
const app = express();app.use(cors());app.use(express.json());
let cluster;
// 初始化 clusterasync function initCluster() {  cluster = await Cluster.launch({    concurrency: Cluster.CONCURRENCY_CONTEXT,    maxConcurrency: 2, // 最大并发数,可以根据服务器资源调整    puppeteerOptions: {      headless: true,      args: ["--no-sandbox", "--disable-setuid-sandbox"],    },  });
  // 定义任务处理函数  await cluster.task(async ({ page, data: { url, domId, type, quality, format, pages } }) => {    await page.goto(url, { waitUntil: "networkidle0" });
    if (type === "png") {      await page.waitForSelector(`#${domId}`);      const element = await page.$(`#${domId}`);      return await element.screenshot({        type: "jpeg",        quality: parseInt(quality),      });    } else if (type === "pdf") {      return await page.pdf({        format: format || "A4",        printBackground: true,        pageRanges: "1-" + (pages || "1"),      });    }  });
  console.log("Cluster initialized");}
initCluster();
app.get("/", (req, res) => {  res.send("面试刷题,我只用面试鸭~");});
app.post("/download", async (req, res) => {  const { url, quality, format, filename, domId, type, pages } = req.body;
  if (!url || !filename || !domId || !type) {    return res.status(400).send("Missing required parameters");  }
  try {    const result = await cluster.execute({ url, domId, type, quality, format, pages });
    if (type === "png") {      res.contentType("image/png");      res.attachment(filename + ".png");      res.send(Buffer.from(result));    } else if (type === "pdf") {      res.contentType("application/pdf");      res.attachment(filename + ".pdf");      res.send(Buffer.from(result));    } else {      res.status(400).send("Invalid type");    }  } catch (error) {    console.error(error);    res.status(500).send("Internal Server Error");  }});
const PORT = 3001;app.listen(PORT, () => {  console.log(`Server is running on http://localhost:${PORT}`);});
// 优雅关闭process.on("SIGINT", async () => {  console.log("Closing cluster...");  await cluster.close();  process.exit(0);});
我们使用 puppeteer-cluster 创建了一个浏览器实例池,有如下优点:
- 可以更有效地处理并发请求,它会自动把接受的请求加入队列,保证所有请求都会进行处理。
- 将 PDF 和 PNG 生成的逻辑移到了 cluster.task 中,这样可以重用浏览器实例,提高效率
- 设置了最大并发数(maxConcurrency),可以根据服务器资源进行调整,避免资源耗尽
**注意:**在生产环境,我们可能需要在 puppeteerOptions 的 executablePath 设置具体的 chrome 路径,保证服务能找到 chorme
方案 4 - canvas 原生绘制
参考代码:
//获取canvas元素var canvas = document. getElementById( 'poster')var ctx = canvas getContext ('2d')// 设置canvas宽高canvas.width = 600canvas.height = 800// 绘制背景ctx.fillStyle = '#ff6600'ctx. fillRect(0, 0, canvas.width, canvas.height)// 绘制文字ctx. font = 'bold 48px Arial'ctx. fillStyle = '#ffffff•ctx.textAlign = 'center'ctx. fillText ('*HEd', canvas.width / 2, 120)ctx-font = '24px Arial'ctx.fillText('这里是副标题canvas. width / 2, 180)// 绘制图片var img = new Image()img. onload = function (){ctx. drawImage(img, 100, 250, 400, 400)}img.src ='图片地址'canvas 虽然高性能,但是工作量大,一般生产环境不会使用
总结
在实际开发中,面对不同场景我们会使用不同的方案,那我们公司的线上项目为例:在我们的「面试鸭」和「编程导航」的生成海报功能都是使用了 html2canvas 来生成海报,因为它要比 Puppeteer 快,能够让用户更快拿到海报图,在「老鱼简历」中,我们使用 Puppeteer 来导出简历,这样导出的简历和看到的更加一致,并且清晰度更加高。
上面的代码都在仓库:https://github.com/chaseFunny/pdf-png-downloader,还提供了简单的页面方便大家体验调试