Exporting DOM Elements to Images and PDFs: Comparison and Implementation of Multiple Solutions
/ 9 min read /
Table of Contents 目录
This article details multiple methods for converting HTML DOM elements into images or PDFs, including using libraries like html2canvas, dom-to-image, Puppeteer, and raw canvas rendering. It analyzes the implementation process, use cases, pros and cons of each method, and provides code examples to help developers choose the right solution based on specific needs.
Background
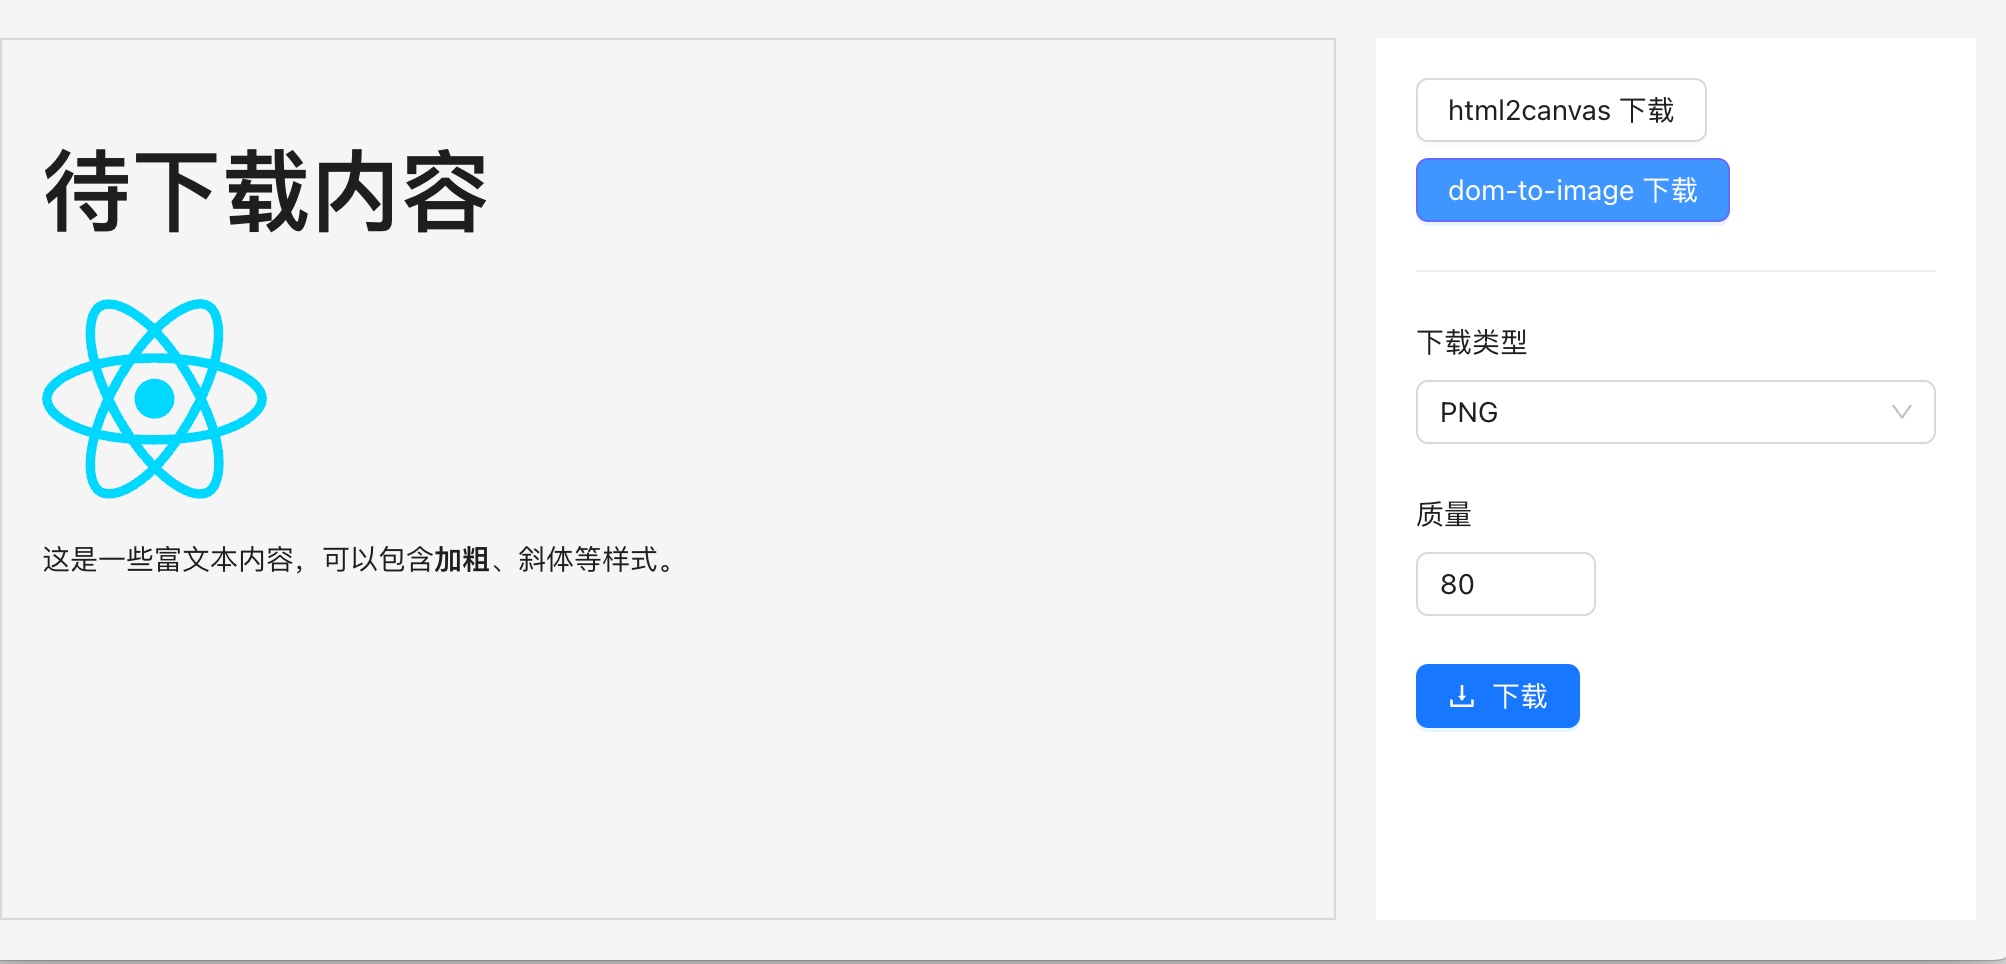
In everyday frontend development, there is often a need to download DOM elements from a page as PNG or PDF to the local device. This includes features like posters, resume exports, and more. In our own product “Code Clipper”, we use html2canvas to export code snippets as images:
Looks decent, right? If you want to share code snippets, give it a try – it’s quite handy. So what methods are available for downloading DOM elements locally? So far, I’ve collected:
- Using third-party libraries like html2canvas, dom-to-image
- Running a Node service with Puppeteer
- Raw canvas rendering
These are approaches used in real projects, each suitable for different scenarios. Let’s look at how each method works, its use cases, and pros and cons.
Approach 1 - html2canvas
html2canvas is a JavaScript library specifically designed to parse DOM structures and their associated CSS styles, rendering web content into a Canvas element. Below is an example of downloading an element as PNG:
/** * download dom element as image * @param elementId DOM element's id * @param fileName file name for the downloaded image * @returns */export const downloadDOMElementAsImage = async (elementId: string, fileName: string) => { const element = document.getElementById(elementId) as HTMLElement; if (!element) return message.warn('cannot find DOM element'); try { const canvas = await html2canvas(element, { useCORS: true, allowTaint: true, scale: 2, // improve clarity backgroundColor: 'transparent', }); const dataUrl = canvas.toDataURL('image/png'); const link = document.createElement('a'); link.style.visibility = 'hidden'; link.href = dataUrl; link.download = fileName; document.body.appendChild(link); link.click(); document.body.removeChild(link); } catch (error: any) { message.error('failed to convert DOM element to image and download', error); } element.style.transform = 'scale(1)';};With html2canvas, we encapsulate a method for downloading a page DOM as an image, making it easy to call and download page elements.
Use Cases
Suitable for scenarios where you need to render complex DOM structures (including styles, background images, fonts, etc.) into an image. It captures most CSS styles and HTML content.
Pros and Cons
Pros:
- Very simple to use, supports most CSS
- Built-in cross-origin solution
- Can filter specific DOM elements using
ignoreElements, which is very useful when dealing with complex DOM structures
Cons:
- The downloaded image may not be sharp
- The library is relatively large
- Computationally expensive, poor performance
- Some special styles may not be supported; compatibility issues exist
Approach 2 - dom-to-image
dom-to-image is a JavaScript library that can convert any DOM node into vector (SVG) or raster (PNG or JPEG) images. Like html2canvas, it is also a canvas-based library. Here’s an example of generating PNG:
/** * download DOM element as high-quality image * @param elementId DOM element's id * @param fileName file name for the downloaded image * @param sc scale factor * @returns */export const downloadDOMElementAsImage = async (elementId: string, fileName: string, sc = 3) => {  const element = document.getElementById(elementId) as HTMLElement;  if (!element || !window || !document) return message.warning("cannot find DOM element");  const messageKey = "loading";  message.loading({    content: "downloading...",    duration: 0,    key: messageKey,  });  try {    const clone = element.cloneNode(true) as HTMLElement;    document.body.appendChild(clone);    const originalWidth = element.offsetWidth;    const originalHeight = element.offsetHeight;    const scale = sc; // increase scaling factor to improve resolution
    clone.style.position = "relative";    // clone.style.zIndex = "-1";    clone.style.transform = `scale(${scale})`;    clone.style.transformOrigin = "top left";
    const dataUrl = await domtoimage.toPng(clone, {      width: originalWidth * scale,      height: originalHeight * scale,      style: {        transform: `scale(${scale})`,        transformOrigin: "top left",        width: `${originalWidth}px`,        height: `${originalHeight}px`,      },      cacheBust: true,      quality: 1,      bgcolor: "transparent",    });
    const link = document.createElement("a");    link.href = dataUrl;    link.download = fileName;    document.body.appendChild(link);    link.click();    document.body.removeChild(link);    message.destroy(messageKey);    setTimeout(() => {      document.body.removeChild(clone);    }, 500);  } catch (e: any) {    message.destroy(messageKey);    console.error("download failed", e.message);    message.error("download failed: " + e.message);  }};
As you can see, it’s also very simple to use. We can control the clarity and size of the downloaded image via the sc parameter.
Use Cases
If you are concerned about project size, need high text layout fidelity, stable text/image rendering, or the ability to process structured data, dom-to-image is a good choice.
Pros and Cons
Pros:
- Library is lightweight
- Suitable for scenarios requiring multiple format exports
Cons:
- Cross-origin handling must be done manually
Approach 3.1 - Puppeteer
Although the two methods above can generate images on the web, if you need to:
- Be compatible with multiple environments,
- Support both PNG and PDF generation with high clarity,
- Handle cross-origin images,
- Support all CSS,
- Control project size,
then you can use Puppeteer. It solves all the problems above. Puppeteer is a powerful Node.js library that controls Chrome or Chromium to generate the desired PNG or PDF. Below we use express + Puppeteer to quickly implement an image download service:
// Node service app.js example codeimport cors from "cors";import express from "express";import puppeteer from "puppeteer";
const app = express();app.use(cors());app.use(express.json());
app.get("/", (req, res) => {  res.send("interview practice, I only use InterviewDuck~");});
app.post("/download", async (req, res) => {  const { url, quality, format, filename, domId, type } = req.body;
  if (!url || !filename || !domId || !type) {    return res.status(400).send("Missing required parameters");  }
  try {    const browser = await puppeteer.launch();    const page = await browser.newPage();    await page.setDefaultNavigationTimeout(60000);    await page.goto(url, { waitUntil: "networkidle0" });
    if (type === "png") {      await page.waitForSelector(`#${domId}`);
      // wait for element to be ready (first line was duplicated, kept original)      await page.waitForSelector(`#${domId}`);
      const element = await page.$(`#${domId}`);      console.log(element, "element");
      const imageBuffer = await element.screenshot({        type: "jpeg",        quality: parseInt(quality), // only applies to jpeg        // omitBackground: true,      });      await browser.close();      res.contentType("image/jpeg");      res.attachment(filename + ".jpeg");      res.send(Buffer.from(imageBuffer, "binary"));    } else if (type === "pdf") {      const pdf = await page.pdf({        format: format || "A4",        printBackground: true,        pageRanges: "1-" + (req.body.pages || "1"),      });      res.contentType("application/pdf");      res.attachment("resume.pdf");      res.send(Buffer.from(pdf));    } else {      res.status(400).send("Invalid type");    }
    await browser.close();  } catch (error) {    console.error(error);    res.status(500).send("Internal Server Error");  }});
const PORT = 3001;app.listen(PORT, () => {  console.log(`Server is running on http://localhost:${PORT}`);});
With Puppeteer, we can easily take screenshots because it uses the browser engine directly, perfectly reproducing the displayed effects.
Use Cases
If you need to download images and PDFs, have high clarity requirements, deal with complex page elements, and need cross-platform support for generated images/PDFs, Puppeteer is a solid choice.
Pros and Cons
Pros:
- High fidelity rendering: Puppeteer uses a headless Chrome browser, so the generated PDFs and screenshots are almost identical to what users see in the browser.
- Rich API: Puppeteer provides a vast number of APIs to solve virtually any problem. Relevant docs: https://github.com/puppeteer/puppeteer/blob/v1.5.0/docs/api.md – lots of APIs.
- Support for latest CSS: Since Puppeteer uses Chrome, it supports all modern web features, giving it an edge when processing complex pages.
- Cross-origin resource support: Puppeteer usually runs in headless mode, where browser cross-origin restrictions are more relaxed.
Cons:
- Requires server deployment: Puppeteer must run on the server side, requiring a backend environment.
- High resource consumption: Starting a full Chrome browser instance is resource-intensive and may impact server performance.
- Additional learning cost: If the team is unfamiliar with Puppeteer, extra learning and maintenance effort may be needed.
However, using Puppeteer in production may lead to resource exhaustion under heavy concurrent requests, potentially crashing the download service. In such cases, we can use puppeteer-cluster to implement a request queue, managing requests so that only a fixed number are processed simultaneously while others wait.
Approach 3.2 - puppeteer-cluster
Code example:
// Source: https://github.com/chaseFunny/pdf-png-downloaderimport cors from "cors";import express from "express";import { Cluster } from "puppeteer-cluster";
const app = express();app.use(cors());app.use(express.json());
let cluster;
// initialize clusterasync function initCluster() {  cluster = await Cluster.launch({    concurrency: Cluster.CONCURRENCY_CONTEXT,    maxConcurrency: 2, // maximum concurrency, adjust based on server resources    puppeteerOptions: {      headless: true,      args: ["--no-sandbox", "--disable-setuid-sandbox"],    },  });
  await cluster.task(async ({ page, data: { url, domId, type, quality, format, pages } }) => {    await page.goto(url, { waitUntil: "networkidle0" });
    if (type === "png") {      await page.waitForSelector(`#${domId}`);      const element = await page.$(`#${domId}`);      return await element.screenshot({        type: "jpeg",        quality: parseInt(quality),      });    } else if (type === "pdf") {      return await page.pdf({        format: format || "A4",        printBackground: true,        pageRanges: "1-" + (pages || "1"),      });    }  });
  console.log("Cluster initialized");}
initCluster();
app.get("/", (req, res) => {  res.send("interview practice, I only use InterviewDuck~");});
app.post("/download", async (req, res) => {  const { url, quality, format, filename, domId, type, pages } = req.body;
  if (!url || !filename || !domId || !type) {    return res.status(400).send("Missing required parameters");  }
  try {    const result = await cluster.execute({ url, domId, type, quality, format, pages });
    if (type === "png") {      res.contentType("image/png");      res.attachment(filename + ".png");      res.send(Buffer.from(result));    } else if (type === "pdf") {      res.contentType("application/pdf");      res.attachment(filename + ".pdf");      res.send(Buffer.from(result));    } else {      res.status(400).send("Invalid type");    }  } catch (error) {    console.error(error);    res.status(500).send("Internal Server Error");  }});
const PORT = 3001;app.listen(PORT, () => {  console.log(`Server is running on http://localhost:${PORT}`);});
// graceful shutdownprocess.on("SIGINT", async () => {  console.log("Closing cluster...");  await cluster.close();  process.exit(0);});
By using puppeteer-cluster, we create a browser instance pool with the following advantages:
- It handles concurrent requests more efficiently by automatically queuing incoming requests, ensuring all are processed.
- The logic for PDF and PNG generation is moved into
cluster.task, allowing reuse of browser instances for better efficiency. - We set a maximum concurrency (
maxConcurrency) that can be adjusted based on server resources, preventing resource exhaustion.
Note: In production, you may need to specify the exact Chrome path in puppeteerOptions.executablePath to ensure the service can locate Chrome.
Approach 4 - Raw canvas rendering
Reference code:
// get canvas elementvar canvas = document.getElementById('poster')var ctx = canvas.getContext('2d')// set canvas width and heightcanvas.width = 600canvas.height = 800// draw backgroundctx.fillStyle = '#ff6600'ctx.fillRect(0, 0, canvas.width, canvas.height)// draw textctx.font = 'bold 48px Arial'ctx.fillStyle = '#ffffff'ctx.textAlign = 'center'ctx.fillText('HEd', canvas.width / 2, 120)ctx.font = '24px Arial'ctx.fillText('subtitle here', canvas.width / 2, 180)// draw imagevar img = new Image()img.onload = function () { ctx.drawImage(img, 100, 250, 400, 400)}img.src = 'image url'Although canvas is high-performance, it requires a large amount of manual work and is generally not used in production.
Summary
In real development, we choose different solutions for different scenarios. Taking our company’s online projects as an example: In “InterviewDuck” and “Code Navigation”, we use html2canvas to generate posters because it is faster than Puppeteer, allowing users to get the poster image more quickly. In “OldFish Resume”, we use Puppeteer to export resumes, ensuring the exported resume looks exactly as displayed and has higher clarity.
All the code above is in this repository: https://github.com/chaseFunny/pdf-png-downloader. It also includes a simple page for you to try and debug.